Showing posts with label tutorial. Show all posts

Friday, March 20, 2009

Toothpick Dolls from Yesteryear

If you're looking for the Advanced Toothpick Doll Tutorial advertised in the Angela Michelle Dolls Newsletter, click here. If you don't receive the Angela Michelle Dolls Newsletter & feel hopelessly out of the loop, click here.

This week I'm showing off some of my very first dolls (from about 15 years ago), done in the first fledgling years of my career as a teenage doll-maker.

Today I would like you to meet...

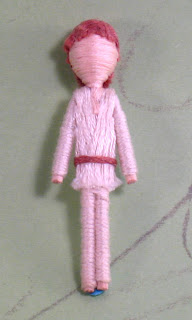
A few of the typical dolls I used to do (typical other than martians & Star Wars, I mean).

A stylin' curlytop with an oh-so-chic butt skirt. About the same time I picked up on toothpick dolls, someone gave me a little container of various felt shapes - circles, hearts, ovals, flowers, etc. This, along with some lace scraps, became my accessories of choice when fashion designing for the toothpick community (a highly overlooked demographic group, by the way).

This Lady in Blue models a green felt flower folded in half for her purse, & a black felt oval draped over her head in something that hopefully resembles a hat. The decoration on the hat is a piece cut out from a strip of lace. The innovation of a 13-year-old - something I wish I had back, at times!


When fashion supercedes function, you know you've hit high design. This look features a huge pink felt heart draped across the arm & accented with bits of lace. Not sure she can move that arm, but toothpick dolls have never really clamored for ease of movement, luckily. Her hair is set in a style that was supposed to make it look like her bangs were draping down over one eye, but instead kind of makes her look like she forever has her head turned to the side. Looking at...?

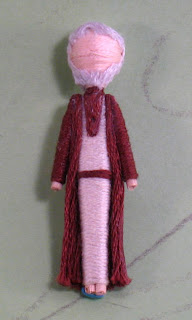
Ah, one of my first attempts at a full skirt & other drape-y things. I was quite proud of this Princess-Lady when I made her so many years ago. She had looong hair (down to her feet) and a little crown-tiara thing going on. Unfortunately, she met the fate that a few dolls met during those beginning years - she had her neck broken while I was carrying her around in my jeans pocket at school. I did learn...

Wednesday, March 18, 2009

A Toothpick Galaxy Far, Far Away...

If you're looking for the Advanced Toothpick Doll Tutorial advertised in the Angela Michelle Dolls Newsletter, click here. If you don't receive the Angela Michelle Dolls Newsletter & feel hopelessly out of the loop, click here.


This week I'm showing off some of my very first dolls (from about 15 years ago), done in the first fledgling years of my career as a teenage doll-maker.

Today I give you my homage to a galaxy far, far away...
OK, let's have some fun. Can you guess who these characters are? I could tell you the name of the movie(s), but I'm really hoping I don't have to. I know these were made years ago before I was really any good at toothpick doll-making, but come on! Help out my ego & tell me you can recognize these dolls. It's a good cause, really...
#1. We have the obligatory mentor, both older & wiser than our hot-headed hero. And also with an apparently crummy movie contract, as he only lasted for the first half of the first one of six movies.
#2. Aforementioned hot-headed hero. What do you get when you mix a restless whippersnapper who just happens to be a natural talent and a nefarious villain with a shocking secret about said whippersnapper's true origins? A franchise.
#3. Damsel in Distress. Just don't tell her that.

#4. Unlikely Good Guy. If you can buy a good guy who makes a living smuggling & has an unnatural fear of carbon-based preservation methods, that is.

There was also a half-finished Chewy running around, but I opted not to photograph him, as he's just not as intimidating without a head. And he will probably never get one at this point...

Next show & tell on Friday!

Tuesday, March 17, 2009

Toothpick Martians

If you're looking for the Advanced Toothpick Doll Tutorial advertised in the Angela Michelle Dolls Newsletter, click here. If you don't receive the Angela Michelle Dolls Newsletter & feel hopelessly out of the loop, click here.

This week I'm showing off some of my very first dolls (from about 15 years ago), done in the first fledgling years of my career as a teenage doll-maker.

Today I would like you to meet...

Mr. & Mrs. Martian, respectively.

I think Mrs. Martian, who declined to give her first name as it is unintelligible in our tongue, was the very first doll I made to debut the skirt technique. She's quite a happening lady, with her cat's eye glasses (fashion takes awhile to reach her stretch of the galaxy), and her cute little bob.

Mr. Martian, as I remember, has always been quite proud of his bowtie, which was made of several small balls of thread and assembled in something that, at the time I made him, seemed like a bowtie shape. His grin is, you could say, stuck to his face eternally.

The couple features three fingers & toes per appendage, and a somewhat unruly set of eyes that spring out from the top of their forehead. I really shouldn't tell you this, but Mrs. Martian's pink glasses are for show only. She once saw an episode of Mary Tyler Moore, and there was no going back...

When I remember my early dolls, this couple always stands out. I made several sets, but this is the only couple I kept, apparently. For some reason, I thought they made quite appropriate gifts, although I can't recall for what occasion...

Monday, March 16, 2009

My First Doll: Pathetic, Sweet Thing

Want to see the first toothpick doll I ever made (15 long years ago...)? Pictures at the end of this post.

Well, if you subscribe to the Angela Michelle Dolls Newsletter, you probably came looking for the Advanced Toothpick Doll Tutorial. You'll get it, don't worry! There's a link to all the spilled secrets below. I recently taught a tutorial in the Custom Dolls, Houses, & Miniatures forums. We covered the basics, and then delved into how to make a skirt (that will make a doll stand on her own), and how to start adding intricate accents with split-thread detailing.

To access the tutorial:

1 - Head to http://www.cdhm.org/. Click on "Forums" in the top right corner.

2 - If you're not already a member of this forum, scroll down to "CDHM Announcements". Click on the last topic in that section, "CDHM Forum - Registration Benefits". It will show you how to join (it's free, by the way).

3 - Join the forum! It's free, and you'll be able to see my toothpick doll tutorial, as well as a host of other tutorials, tips, & tons of information relating to dolls & miniatures. There are some fabulous artisans there!

4 - Once you've joined, scroll down to the "Tutorials" board & click on "Past Tutorials". Go to "Click here for Past Classes", scroll to the bottom of that list & you'll see "Learn to Make a Toothpick Doll". There you go! Oh, and before you leave there, check out some of those other tutorials - they're so much fun! Bonus if you have free time that's begging to be filled in a creative way.

All of the information in that tutorial will eventually make its way into this blog, but I'm holding off for a couple months, as CDHM is often able to publish its tutorials in publications, & a magazine will decline if the information is freely available on the internet already. Thus, the schedule switch. But you can still access that entire tutorial today if you wish.

So, what to do with the next week? Thought you might like seeing how I started in the Toothpick World...


This was my first doll, made from a flyer my mom picked up in a craft store. That was circa 1994, & I was about 13 years old. We were stationed on an air base in Italy, & toothpicks & thread were some of the few craft supplies I had access to.

The rest of this week I'll pull out some photos of other oooold dolls, including Mr. & Mrs. Martian, & my homage to Star Wars.

Fun, fun :)

Friday, January 23, 2009

Get a Free Doll Kit!

Everything you need to make your very own toothpick doll, except a third hand.

I'm getting ready to launch a new product & I need your help! Toothpick doll kits are themed kits with instructions that are easy to follow & entertaining. They'll include everything you need, from glue to scissors to thread to fun extras. Perfect for an afternoon craft or a project to take on a trip with you.

Want to be a tester?

If you'd like to know how to make a basic toothpick doll, sign up to be a kit tester. I'll send you a sample kit for free in exchange for your feedback (I will send a one-page comment sheet with each kit, or you can fill out a short online comment form). The first two kits offered will be a Pirate kit & a Princess kit.

To sign up, email me (angela@angelamichelledolls.com) with the following information:

Name

Age (Must be 12 years or older. Preference will be given to volunteers age 12-18, but I will be sending sample kits to 18+ as well)

Email

Mailing Address

Theme Preference (Pirate or Princess)

Space is limited, & the list will fill on a first-come basis, so please sign up quickly! If you know of someone (daughter, friend, sister) who would be interested, send 'em on over here!

Deadline to sign up: January 31

Monday, December 8, 2008

Drumroll, please...

We've reached the grand conclusion of the Toothpick Doll Tutorial! After cutting, glueing, curling, dressing, wrapping, designing, & creating, you now know how to make a toothpick doll! Congratulations! I want to see a picture!


You've mastered Toothpick Doll Basics! Next week's tutorial: Toothpick Doll Advanced...

Just kidding :) We'll start a little slower. Seriously, though - if you have questions or would like to know more about making toothpick dolls, ask! I'll be doing more tutorials, & can certainly fit your curiousity into the tutorial schedule.

And, as promised, I am giving away the toothpick doll I created during the tutorial. The winner is...


Please email me at angela@angelamichelledolls. Let me know your mailing address & if you'd like the doll mounted on a pinback or left plain. Please contact me by the end of the week!
Thanks to all who followed the tutorial - hope you had fun!

Saturday, December 6, 2008

Toothpick Doll Tutorial #6: Finishing Touches

Tutorial & Giveaway!

All this week, I'm doing a toothpick doll tutorial, & at the end, I'll give away my finished doll. To enter the giveaway, just leave a comment on any of the Tutorial blog posts. Since there's a new post every day this week, you can enter every day! I'll announce the winner on Monday, Dec. 8. Enjoy the tutorial! Oh, & take some pictures of your dolls - I want to see them!

Bows & Such: Finishing Touches
By now, your doll is clothed & has arms, a head - all those things that are fairly necessary in recognizing your work as a doll. Now comes the incredibly satisfying part of adding little finishing touches. Don't skip this part! It really makes your doll look finished & will take some of the attention off of your mishapen head (maybe).

(Editor's note: Yes, I chew my nails. When you get to the level where you're making things like this 1-inch Queen, you will, too. Fair warning.)

You can add all the finishes your imagination can come up with, well...within reason. You may want to draw the line at the blinking eyes or spinning head. If your imagination isn't working for one reason or another, ask the nearest child - they'll come up with enough suggestions to keep you busy! When I make dolls with my nieces & nephew, we add faces, roses, bows, hats, anything we can come up with (& I can make!) My two oldest nieces are making their own dolls by now, & wow, are they good! We're talking ball gowns with feather hairpieces, & elven archers.

For now, let's keep it simple - bows. Bows are beautiful, chic, trendy, & highly undervalued in haute couture. Not to mention, EASY! (Don't underestimate that last reason!) People ask me all the time how I make such tiny bows. This question has always struck me as odd, probably because of the answer - you start with a big bow. No, I have no interest in spending an obscene amount of time & adding immeasurably to my stress level by attempting to tie a 1/4 inch bow. Not happening. At least, not today. Just tie a bow, any size, then gently pull the ends until it's as teeny tiny as you like. Presto! Instant marvel! So go ahead, tie a few bows, add them wherever your doll would like, and...

TADAAAA!!! You have a toothpick doll, your very first. I'm so proud. Always, always, ALWAYS keep your first doll! Never give her away, sell her, misplace her, or chuck her out. I still have the very first doll I made from about 15 years ago, the pathetic little thing. She's got a special spot in my heart, not the least because she's absolutely hilarious to look at! Not saying that your first doll is a laughing matter, of course. But just in case she may someday derive a chuckle, keep her! It's fun to see where you've come from.

If you do decide to use this tutorial & make a doll, please send me a picture! I'd love to see your creativity. Not to mention it'll do my teacher-heart good. Hope you enjoyed the journey!

Leave a comment to enter the giveaway!

You can leave as many comments as you like, asking questions, making astute observations, etc., although your name only gets entered once every day. Yes, you can go back & comment on past days if you missed some!

You can enter the giveway up through Sunday, Dec. 7. On Monday, I'll draw a name & announce the winner. If you like, I'll mount the doll on a pinback. She'd be cute on a hoodie or cardigan, or on a totebag or bookbag. Check back Monday to see if you've won!

Friday, December 5, 2008

Toothpick Doll Tutorial #5: Toothpick Salon

Tutorial & Giveaway!
All this week, I'm doing a toothpick doll tutorial, & at the end of the week, I'll give away my finished doll. To enter the giveaway, just leave a comment on any of the Tutorial blog posts. Since there's a new post every day this week, you can enter every day! I'll announce the winner on Monday, Dec. 8. Enjoy the tutorial! Oh, & take some pictures of your dolls - I want to see them!


Hairstyling in Miniature

Ok, have you gotten over the stress of making your first head? Good! Now let's cover it.


If you got really ambitious, you should have curls by now. If working on tiny things can leave you in a stressed-out, jittery mess, may I suggest you go with straight hair. Quite fashionable.
Regardless, you're going to begin the same way. Put down a line of glue that starts behind one ear, comes up across the forehead, & ends behind the other ear. (No, there are no actual ears. You're making a craft! If your imagination isn't on yet, now would be a good time to flip the switch.) You're basically tracing the doll's hairline. Now follow that line with your first piece of thread (see picture above). When using curly hair, you'll have to finagle the thread a tad to get it to lay down in a straight line. Again, straight hair is all the rage with beginner dolls. Perfect for preventing nervous breakdowns.

Take a deep breath, ya done good. Now do it again, & keep right on going until your doll is bald no more. You'll be pretty good at the glue, thread, glue, finagle, thread, deep breath, glue, thread routine.

Yay, she's done! Beauty like none other! The Mona Lisa's smile is now tinged with deep envy. Oh, alright, if you don't prefer the "windblown by a hurricane" look, we'll fix her hair...

Now comes my favorite part - hairstyling. Have fun with this - it's the only time you can guarantee a good hair day because you get to glue the hair in place! Maybe this is why I struggle with doing real hair. Give her a trim where needed, & just start glueing the hair down wherever you like. I cut a short snippet of curls & glued them in place for bangs on my gal.

Tomorrow: Finishing Touches!

translation: You're almost stinkin' done!

Leave a comment to enter the giveaway!

You can leave as many comments as you like, asking questions, making astute observations, etc., although your name only gets entered once every day. Yes, you can go back & comment on past days if you missed some!

Thursday, December 4, 2008

Toothpick Doll Tutorial #4: Finally a Head!

Tutorial & Giveaway!


All this week, I'm doing a toothpick doll tutorial, & at the end of the week, I'll give away my finished doll. To enter the giveaway, just leave a comment on any of the Tutorial blog posts. Since there's a new post every day this week, you can enter every day! I'll announce the winner on Monday, Dec. 8. Enjoy the tutorial! Oh, & take some pictures of your dolls - I want to see them!


Just How Do You Make Those Heads?
This is probably the question I get asked most often. So now, just for you, I shall reveal the Secret of the Head. Take good notes.

Start your thread where your shoulders left off & wrap along the toothpick until you reach the end. From here on out, just wrap back & forth along that toothpick until you get a head-shape. Don't worry - there are pictures to follow! I'm not just leaving you with that.

TIP: When you get to the end of the toothpick (like in the picture above), put a little dot of glue there & use that to help secure the thread wrapping at the end. This small act will single-handedly save your sanity.


See in the picture above - you just wrap back & forth until you're satisfied. Where you need to, put a dab of glue to hold the thread in place. This takes practice! I give you full permission to let your very first doll be a conehead. Mine had a rather thin oval for a head - give yourself a break! Now, when you're finished, end of the thread at the back.

Don't get too excited - you're not done yet! Now it's time to seal the head.

Put some drops of glue around the top & chin of your head (well, your doll's head, then). With your finger, smooth the glue OVER THE ENTIRE HEAD. Try to do it in just a few smooth wipes, then let the head dry. The glue will dry clear.

WARNING: Failure to seal the head can result in your head popping off. If this happens to you, I will probably be able to hear your wretched wail from here. Don't let your head pop off!

NOW, you're done. Take a deep breath, your doll looks lovely! At this point, you should feel so proud of yourself that you don't even mind that your doll is as bald as a beach ball.

Tomorrow: Hairstyles in Miniature

But first - if you would like curly hair for your doll, there's one more step you need to do today. Wrap some thread around a toothpick & secure it with a small piece of tape. Soak it for about an hour or so & let it dry overnight. Tomorrow, you shall have curls. Be safe & wrap 3-4 toothpicks of hair to make sure you have enough. Make it 12 if you're going for the Rapunzel look. (Not recommended on your first doll, by the way!)

Leave a comment to enter the giveaway!

You can leave as many comments as you like, asking questions, making astute observations, etc., although your name only gets entered once every day you leave a comment. Yes, you can go back & comment on past days if you missed some!

Wednesday, December 3, 2008

Toothpick Doll Tutorial #3: A Shoulder to Lean On

Tutorial & Giveaway!

All this week, I'm doing a toothpick doll tutorial, & at the end of the week, I'll give away my finished doll. To enter the giveaway, just leave a comment on any of the Tutorial blog posts. Since there's a new post every day this week, you can enter every day! I'll announce the winner on Monday, Dec. 8. Enjoy the tutorial! Oh, & take some pictures of your dolls - I want to see them!

Today is All About the Shoulders

Shoulders are tricky, fair warning! I'm going to give you some tips to make them easy & beautiful. Start your shoulder at the back of your doll, about 1/2 down from the neck. Glue the end of the thread in place between the arms.Now flip the doll over & put a light line of glue down both arms from the bottom of the shoulders up to the neck, like in the picture above. If you want a little added security, put a line of glue on the front as well. Don't get too glue-happy here - you don't want glue squishing out between the threads. Your doll will appreciate your restraint. Take your time & start wrapping the thread around to form the shoulders. Wrap up toward the neck. Try to get the wraps as close to each other as possible. The glue will go a long way towards making your thread stay in place, but you may need to press it in place some with your finger as well. Go slow, take your time, don't stress. If you end up with a messy spot on your shoulders, we'll stick a bow on it at the end. Oh, the wonderful power of bows!Keep wrapping up until you get to the neck. Wrap a couple times around the neck, then end the thread. Tada! You have shoulders! Go you.

Tomorrow: Turning the Spindly Head into a Real Head


Leave a comment to enter the giveaway!


You can leave as many comments as you like, asking questions, making astute observations, etc., although your name only gets entered once every day you leave a comment. Yes, you can go back & comment on past days if you missed some!

Tuesday, December 2, 2008

Toothpick Doll Tutorial #2: A Dress & Some Arms

Tutorial & Giveaway!

All this week, I'm doing a toothpick doll tutorial, & at the end of the week, I'll give away my finished doll. To enter the giveaway, just leave a comment on any of the Tutorial blog posts. Since there's a new post every day this week, you can enter every day! I'll announce the winner on Monday, Dec. 8. Enjoy the tutorial! Oh, & take some pictures of your dolls - I want to see them!

Starting the Dress


So, you have your supplies, you have your arms, you have a nicely glued & dry body - on to the outfit!

Glue the thread you want to use for the dress to the doll, just below the shoulders. (See the picture above). It helps to press the thread down with your thumb to get rid of any extra glue & secure the end of the thread. Now you're ready to clothe this doll!


Just start wrapping the thread around the doll, going toward the feet. Try to keep your wrapping pretty close together, so you don't end up with gaps in the doll's dress (how embarassing!)


To end off, just clip the thread & glue it down. I've ended mine shorter, because I want to add a stripe to the bottom of the dress. Now don't get too fashion-designer on your first doll, but go ahead & add a stripe or two if you'd like.

To do the arms, start the thread at the pointed end & wrap down to the hand. NOTE: You don't have to start the thread at the very tip of the point - you'll see I started about 1/4" down. That part will be covered by the shoulders, so save your eyes & patience! When both arms are done, glue them on.

Wonderful! Now set her aside & don't touch her! The arms will take a while to dry, so we'll pick back up tomorrow.

Tomorrow: Shoulders

Leave a comment to enter the giveaway!

You can leave as many comments as you like, asking questions, making astute observations, etc., although your name only gets entered once every day you leave a comment. Yes, you can go back & comment on past days if you missed some!

Monday, December 1, 2008

Toothpick Doll Tutorial #1: Supplies & Bodies

Tutorial & Giveaway!
Want to learn how to make dolls out of toothpicks? Stick around! All this week, I'm doing a Doll-Making Tutorial. At the end of the week, I'll be giving away my finished doll. To enter, simply comment on any of the Toothpick Doll Tutorial posts. There'll be a new post every day this week (Monday-Saturday), which means you can enter once every day. Next Monday, I'll announce the winner. On to the doll-making!
First Things First: Supplies
Yes, it does take more than toothpicks to make Toothpick Dolls. But not much.

You will need:
- Toothpicks

- Tacky Glue (or any white craft glue)

- Embroidery Floss (make sure you have colors for skin, hair, & a few colors for the outfit)

- A Pencil

- A ruler (any size)

- Scissors (I use two pairs - a big pair for cutting the toothpicks & a small pair for cutting the thread. You'll survive if you don't have a small pair, they're just easier to manage. About the big pair - promise me you'll cut your toothpicks with a nice, decent-size pair of scissors. Big scissors are easier to control when cutting toothpicks, & your fingers will thank you.)

Ok, go gather!

Toothpick Doll Anatomy
Pull out your ruler, toothpicks, scissors (BIG PAIR!) & pencil.

On two toothpicks, mark 2 inches from one end. These are the legs, nice & long. On one toothpick, mark 1 inch from each end. These are the arms - just throw away the middle part after you cut the arms. On one toothpick, mark 1 1/4 inch from one end. This is the torso & head. After you cut this piece, make another mark 5/8 inch from the cut end. This marks the head.

After you cut the toothpicks to size, put your little arms away someplace safe - we won't need them again until tomorrow. Glue the legs to the torso, like the picture below. Make sure the legs don't go above the mark, or you won't be able to make your head. Congratulations! You have a body! Now don't touch it again until all that white glue turns clear. You wouldn't want crooked legs!

Tomorrow: A Dress & Some Arms

Leave a comment to enter the giveaway!

Saturday, November 1, 2008

Elf 3's Grand Entrance

For Round Robin Collaboration: All 3 elves are here!

Here's the third member of the worker elves' party. The prince has stepped out of the shot for this one & no wonder - her hat isn't finished yet! It still looks a little odd, & the prince is a little too worried about bad press to be seen with her quite yet.

There! Hat done, shoes tipped, she's ready for work, if you can convince her to leave her flowers for a moment. There's a certain question she's been asking the daisies for a while now, & I'm afraid we're not going to get any work out of her just yet! Oh, look - the Prince has come back. You may want to cover your ears, though - as he may begin to serenade, as he's heard that all princes are supposed to do.

Next up: all three elves in place around the Herald's mechanical innards.

Day 2 of Elf-making

For Round Robin Collaboration with KyEliza:


The final day (hopefully!) of Elf-making begins. I'm all set with my tools, a huge stack of candy corn (the kind with the pumpkins) & a massive Beijing Starbucks mug of Awake Tea (yes, it's legal!).


Well, the Princess & Jester have wandered off (so hard to keep their interest), but the Prince has hopped over to watch. Probably because this third little elf is a she - and a very opinionated she, too. I was going to dress her all in pink, but apparently this is not a pink sort of elf. I think I've convinced her to have a pink collar & belt, but we'll see.

Friday, October 31, 2008

Elf 2 in Full Costume

For Round Robin Collaboration: The second Elf has arrived! He's a bit of a clumsy one - he'll be hanging off the end of a spring that has popped loose. Poor guy...he tries so hard to help!


Oh, the Jester is back! No doubt drawn out by the kind & caring nature of the Princess, or the fact that she has been known to whop him upside the head if he doesn't come when called. Ah, friendship. How sweet.
Stay tuned to meet the third little member of this elf party - coming up soon!

Elf 2 Peeks In

For Round Robin Collaboration:

The second little elf in the series is making his way tentatively into the world. You'll notice the Jester has wandered off. Don't worry, he's not still sulking, his memory isn't that long (tiny head, tiny brain, tiny attention span). But the Penny Princess has been lured out to watch the proceedings, no doubt by this elf's cultured fashion sense (his use of pink).
The little green sticks are his legs, & the wee pink dots are his shoes (he'd better not lose one - I'm not making him another!). The string I'm holding in the photo is the beginning of his arms. It's actually 3 strands of 6-ply embroidery floss. One end is taped to the table, & I hold the other end while I glue a thin piece of wire to the strands. Can you see the wire? (Ok, squint!) I'll cover it with another 3 strands of floss, then roll it to form a circular tube. Presto! Arms.

Tuesday, September 23, 2008

In Progress: Beaded Evening Gown


This poor doll has been so patient. She's been in progress for well over a year now, watching as Penny People, Dolled Up Photo Frames, and other projects spring up around her. She will get finished, though, and hopefully soon.
See the fringe on her gown? Well, that thing is one reason she's sat on the shelf for so long. See, each strand in that intricate fringe is beaded separately and individually glued in place to ensure that perfectly even edge that rises up to a point in front. If she weren't so particular about the placement of those tiny little beads, she might be finished by now. But she is, and so she's not.
Her bodice separates her from other dolls I've done in the past as well. It's covered in several pieces of black lace, carefully cut & placed to show off the floral motif. Between that, her satin gown & her beaded fringe, she may be waiting just a little longer until I have both the time & energy to finish her toilette. But then again, aren't all sophisticated ladies entitled to be fashionably late?

Monday, September 8, 2008

Rapunzel's Blonde Highlights


By the time I finished making Rapunzel, I wanted to give her a haircut in the worst way. Personally, I'd think she'd be gorgeous bald. Ok, maybe not. But all that hair was definitely a challenge! Usually, I make curly hair by wrapping thread around a toothpick, soaking it, & removing it when it's dry. Of course, that wasn't good enough for Rapunzel. She was a high-maintenance gal. To get her look, I wrapped the thread around wire that was slightly smaller in diameter than a toothpick, to get smaller curls that would look better in volume. I wrapped thread around those wires for close to an hour to get enough curls, using two different colors of blonde to give her a more natural look.
If you look closely, you'll see that the curly tendrils that frame her face are smaller than the rest of her curls. I love that wispy look when small fly-away pieces escape and frame the face (clarification: I love it on dolls; I hate it when it happens on me!). To get that look, I made MORE curls, this time with a much smaller size of wire. Each of these curls had to be placed individually in particular spots to get that "the wind just did it" look.
To see more pictures of Rapunzel, stop by to visit her! It does get lonely in that tower...
Have you seen a doll on this blog or on my website that you'd like to know more about? Let me know! I'll feature her in a future post.

Friday, July 4, 2008

Why 'The Elegant Toothpick'?

I am a dollmaker. You can make dolls out of all sorts of things - clay, cloth & porcelain are the usual suspects. I use toothpicks. Look closely at Rapunzel here. Imagine the head stripped down to a single toothpick. Under the dress are two spindly little toothpick legs (thank goodness for floor-length skirts). Each arm is two pieces of toothpick, attached to look bent at the elbow. Everything added to the toothpick skeleton: the head, the body structure, the gown, the hair, the flowers, is all embroidery floss, or thread. Yes, I'm nuts; yes, I love it.

I've been making toothpick dolls for about 15 years now, & would love to share some of the techniques I've come up with. Got a trace of insanity running through you? It really does help. If you'd like to learn, stick around. Toothpick dolls are tiny, fiddly, exasperating, & oh-so-fun.
Oh, by the way, there is an easier version. Toothpick Doll Lite. A little more basic, but with just as much personality. I teach this version to girls at Birthday Parties & other get-togethers. If you want to learn, this is what you start out with. Someday I'll post a photo of the first doll I ever made. The sad little thing. In the meantime, check out more photos of both kinds of dolls at http://www.angelamichelledolls.com/